Securing the Cluster
This Installation & Administrator Guide section discusses cluster security issues that are exclusive to Scyld ClusterWare. We assume that the cluster administrator is familiar with security issues that are not solely related to ClusterWare, such as securing the cluster from outside access, optionally enabling various Red Hat RHEL/CentOS functionalities for logging and auditing access to nodes and storage and for managing SELinux.
Authentication
The cluster administrator authentication method is controlled in the
/opt/scyld/clusterware/conf/base.ini file by the plugins.auth
variable and is initially set to "appauth". The scyld-install
installation adds the current user to the auth.tmpadmins variable in that same
file (unless passed the --no-tools argument). The
comma-separated list of user names, corresponding to system accounts
on the head node, are allowed in without additional authentication
checks. The auth.tmpadmins variable is only intended to be used
during early installation, for small experimental clusters, or when
recovering from some sort of failure, and is commented out by the
installer during the installation process.
After installation, any administrator can add additional administrators
through the scyld-adminctl command whose arguments match the other
scyld-*ctl commands as described in the Reference Guide. In the
event of recovery, we suggest that administrators add accounts for
themselves through this tool, and thereafter comment out or clear the
auth.tmpadmins variable.
The "appauth" plugin executes the command defined in the
appauth.app_path variable as user root.
The default implementation of that command is provided by
/opt/scyld/clusterware/bin/pam_authenticator.
This implementation interfaces with the PAM authentication system using the
/etc/pam.d/cw_check_user configuration file.
The contents of this
file initially use local system authentication, although this can be modified to
authenticate against any mechanism available through the PAM system.
For details, see the PAM documentation provided by your distro, the
main PAM project, and the
Red Hat https://access.redhat.com/documentation/en-us/red_hat_enterprise_linux/7/html/system-level_authentication_guide/pluggable_authentication_modules
documentation.
Administrators can provide authentication methods beyond PAM by
implementing a script or application and providing it via the
appauth.app_path variable. Appropriate applications should start
with no arguments, read a username and password separated by a newline
from stdin , and reply with either yes or no followed by a
newline on stdout. For example, a test run of
pam_authenticator looks like:
[example@head ~] sudo /opt/scyld/clusterware/bin/pam_authenticator
tester
not_the_password
no
Role-Based Access Controls
Note
ClusterWare supports the Keycloak authentication system that may be helpful in linking to existing enterprise identity management systems. For more info, see Appendix: Integrating Keycloak with ClusterWare for RBAC
Prior to version 12.2.0, ClusterWare only had the concept of an "admin" who could perform any action on any of the ClusterWare database entries. ClusterWare now has Role-Based Access Controls (RBAC) to allow different "classes" of administrators, some of whom may have signicantly reduced sets of actions that they may perform. There are 6 system-provided Roles plus a "No Access" pseudo-role, described below. A given admin user can be assigned one or more Roles, with each Role granting a specific set of Permissions (roles are additive; if one role grants a permission, then, in general, another role cannot remove it).
By default, the first admin user added to the system will be assigned to the "Full Admin" Role and thereby gain permission to take any action within the system. When creating additional admin users, by default, they will inherit the same roles as their creator. This means that a Full Admin will create other Full Admins - the same as the default on prior versions of ClusterWare.
The current roles established in ClusterWare are:
Authenticated User
Any admin account will have this role which simply grants read-only access to the system. Auth-Users can read nearly any object in the ClusterWare database, with the exception of reserved attributes. This role may be useful for admins who need to report on cluster status and configuration, or perhaps for "power users" who may have some knowledge of cluster operations but should not be able to modify or change the configuration.
Onsite Engineer
The Onsite Engineer role is aimed at technical staff who may need to interact with the machines physically, e.g. to power on/off the machines, or to rack/unrack the machines. In addition to the “read” permissions from Auth-User, the Onsite Engineer is able to issue power-control commands through
scyld-nodectl, and to write/update node information.
Imaging Engineer
The Imaging Engineer is primarily responsible for the creation of new images or modification of existing ones. To better assist them in that role, they are also given permissions to read reserved attributes (to see what nodes are booting into what images).
Production Engineer
For most day-to-day operations, the Production Engineer role might be the most useful. It grants several permissions: to update/modify nodes, including power-control functionality; to update regular and reserved attributes; to create/modify images and boot configs; to create/modify naming pools; and to create/modify git repositories.
Manager
In addition to the Auth-User (read-only) permissions, a Manager can create new admins in the system and view reserved attributes. This role may be useful in larger organizations where the creation and removal of admin accounts could be managed by less technical staff.
Full Admin
The Full Admin role grants all possible permissions to the admin so they can read/write any object, do full power-control on nodes, update, or delete any object, etc.
Permissions that are only granted to Full Admins: control over distros and repos; control over dynamic groups and state sets; control over head nodes; control over hostnames and networks; and control over the cluster configuration itself.
No Access
While not a "role" per se, ClusterWare uses the No Access pseudo-role to enforce a block on an account. If an admin has the No Access role, then they will not be able to perform any actions, regardless of any other role they may have.
It is certainly best practice to remove such blocked accounts from ClusterWare entirely, and to also remove them from any authentication system that feeds ClusterWare (e.g. Keycloak). However, it is sometimes helpful to have "helper" accounts that can be enabled and disabled quickly. E.g. in larger sites, there may be contractors or vendor support staff that need access to a system to help with a problem; but when the problem is resolved, those accounts can be deactivated with the "No Access" role but left in-place in case another support event arises later.
To assign roles when a new account is created, use the scyld-adminctl tool with a comma-separated list of roles:
scyld-adminctl create name=charlie roles=ImagingEngineer,OnsiteEngineer
To assign roles after an account has been created, simply update the admin record with the new list of roles:
scyld-adminctl -isally update roles=Manager
Note
For organizations not wishing to utilize RBAC, simply assign every admin user to the "Full Admin" Role; this is the default and will then mimic the behavior of previous ClusterWare versions.
For more information, including a full description of the Roles and Permissions, see Role-Based Access Control System.
Changing the Database Password
The scyld-install installation configures the ClusterWare database
with a randomly generated password.
This password is used when joining a new head node to the cluster
and must be provided either through a command line or on request during the
installation of the new head node.
This password is stored in the database.admin_pass variable in the
/opt/scyld/clusterware/conf/base.ini file. The details of changing
this password depend on the specific database the cluster is using.
Important
Once this password is changed within the database,
change the database.admin_pass variable in base.ini
and restart the clusterware service on each head node.
Changing the etcd Password
Use the etcdctl tool for the rare occasion that you need to change the etcd
password.
Change the etcd password using the
etcdctlwrapper:sudo /opt/scyld/clusterware-etcd/bin/etcdctl user passwd root
The wrapper code provides the existing password from the
base.inifile to the realetcdctlapplication. That command then requests the new password and confirmation of the new password. Once this command completes, the clusterware service on all head nodes will stop working and allscyld-*ctlcommands will not work until all steps are completed.Update the database.admin_pass variable in
/opt/scyld/clusterware/conf/base.inifile on each head node.Restart the clusterware service on all head nodes:
systemctl start clusterware
After restarting the clusterware service on each head node, all scyld-*ctl
commands will work again.
Warning
If this procedure is not followed, the cluster can become unusable and may require more extreme intervention to recover the etcd database contents. Please contact Penguin Solutions if such recovery is necessary.
Compute Node Remote Access
By default, remote access to compute nodes is provided through SSH
using key-based authentication, although administrators may also
enable password-based SSH in the compute node image by configuring a
password for the root user. Every head node generates a public/private
key pair and places these files in directory
/opt/scyld/clusterware/.ssh/ using the names id_rsa.clusterware
and id_rsa.clusterware.pub. These keys are used by the head nodes
to execute commands on the compute nodes. All head node public keys
are downloaded by compute nodes at boot time by the update_keys.sh
script and appended to /root/.ssh/authorized_keys. This allows any
head node to execute a command on any compute node. The
/opt/scyld/clusterware/.ssh/id_rsa.clusterware key can be used by
system administrators as an "automation" key for tasks like cron
jobs. It is also useful in recovery situations where an administrator
may need to use this private key to directly access compute nodes
This same script that downloads the head node public keys also
downloads the public keys attached to every cluster administrator
account. These accounts are created using the scyld-adminctl tool
as follows:
scyld-adminctl create name=admin keys=@~/.ssh/id_rsa.pub
This allows anyone with the corresponding id_rsa to SSH into
the root account on any compute node booted after the key was
added. The key can also be added as a string or updated for an
existing administrator. For example:
scyld-adminctl -i admin update keys='ssh-rsa AAAAB3NzaC1yc2EAAAADA....'
Cluster administrators are also welcome to add SSH keys to compute
node images in small private clusters. Although adding administrator
accounts with public keys simplifies management of larger clusters
with multiple node images or cluster administrators,
administrator accounts stored in the database or listed in the
base.ini use the same authentication mechanisms described in
the previous section.
Compute Node Host Keys
In most computer systems the SSH sshd daemon uses unique host keys to
identify itself to clients, and host keys are not created during image
creation. This means that each compute node will generate its own host
keys during boot. Since the compute node changes are discarded on reboot,
a new set of keys will be generated with each boot.
In an appropriately protected cluster, some administrators prefer for all compute nodes to share host keys. This can be achieved by storing host keys in the compute node image. For example, to generate host keys and repack the DefaultImage, an administrator can run:
scyld-modimg -i DefaultImage --exec sshd-keygen --overwrite --upload
All nodes that boot using this image after this change will use
identical host keys, so ideally you should reboot the nodes with each
node's updated image.
To remove the host keys from an image,
an administrator needs to delete the /etc/ssh/ssh_host_* files from
the compute node image.
Encrypting Communications
ClusterWare provides an internal cluster certificate authority
that can provide signed certificates to secure communications between
head nodes as well as between head nodes and compute nodes. If you
prefer to provide your own certificates or certificate authority,
Apache can be configured to use those certificates and compute nodes
can verify those signatures during communications. Apache configuration files
are located in /opt/scyld/clusterware/conf/httpd/. The Apache
VirtualHost definition can be found in vhost.conf. The proxy
definition in that file needs to be included into the HTTPS
VirtualHost. For details about how to properly enable HTTPS on the Apache
server, see the documentation provided by your distro.
Once HTTPS is enabled, the ~/.scyldcw/settings.ini file of any
existing ClusterWare tool installation should be updated. In
~/.scyldcw/settings.ini, update the protocol of the client.base_url
variable to use https. It should be safe to leave HTTP enabled for
localhost-only access and, in that case, local tool installations can
continue to use the original localhost-based URL.
The internal cluster certificate authority is implemented using a certificate stored in the backend database, accessible to all head nodes, and can be used to sign certificates used by assorted services on the head node by executing:
/opt/scyld/clusterware/bin/generate_head_certs
The scyld-install script runs this command during
installation or updates to generate separate certificates for
supported services on the head node. The keys and certificates are
stored in /opt/scyld/clusterware/ca_certs/ along with the CA public
key.
Communication between devices in your cluster happens with different levels of encryption and authentication. The following diagram illustrates the use of TLS in communications involving head and compute nodes with all possible configurations:
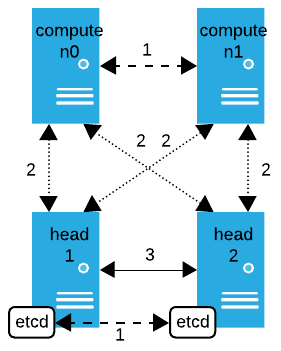
TLS off - not encrypted
Between compute nodes: Communication between compute nodes while chain booting is not encrypted; however, the compute nodes do confirm the size and checksum of the received files based on information from the head node.
Between etcd on head nodes: Communication between etcd on one head node and etcd on another head node is not encrypted or authenticated. All communication between etcd should occur on a secure network.
TLS on - encrypted, but not authenticated by default
TLS on - encrypted and authenticated
Between head nodes: All backend communication between head nodes is encrypted and authenticated.
Configure Encrypted Communication between Head and PXE Compute Nodes
By default, communication between ClusterWare head and PXE compute nodes is
encrypted using SSL/TLS. Leaving this on is highly recommended for security.
If necessary, you can turn off SSL/TLS by setting head.prefer_ssl = False
in the /opt/scyld/clusterware/conf/base.ini file on the head node(s). When
this is enabled, compute nodes send node status information back to
ClusterWare over HTTPS, but do not authenticate the head node.
Configure Encrypted Communication between Head and Diskful Compute Nodes
To enable TLS encryption for diskful compute nodes, modify the base_url in
/etc/clusterware/node.sh to use HTTPS. The sslverify option
in the same file defaults to "no", but if the cluster CA certificate is installed
on the diskful node, setting sslverify=yes in node.sh enables host authentication.
See Installing the clusterware-node Package for details about the node.sh
file.
Configure Client Authentication between Head and Compute Nodes
To enable encryption with client authentication, enable one-time Certificate Signing Requests (CSR) for specific nodes using the following command:
scyld-clusterctl certs enable -i <nodes>
where <nodes> is a comma-separated list of node IDs.
Reboot all specified nodes after running the command.
This functionality requires a TPM on each compute node because the compute nodes create a private key in their TPM on boot and use it to sign a CSR. The CSR is sent to the head node. If CSR signing is enabled for a specific node, the head node responds with a signed client certificate. The node stores the signed client certificate in non-volatile TPM storage.
If the client finds a client certificate in its TPM on the same or subsequent boots, it uses that certificate and the private key in the TPM to authenticate itself to the server. Successful authentication to the server results in an encrypted TLS connection with client authentication.
Note that future releases will allow encryption with host authentication by automating the process of adding the cluster CA certificate to compute nodes booting via UEFI.
Security-Enhanced Linux (SELinux)
Security-Enhanced Linux (SELinux) is a set of patches to the Linux kernel and various utilities that provide mandatory access control to major subsystems of a node. See https://en.wikipedia.org/wiki/Security-Enhanced_Linux for general discussion of SELinux.
ClusterWare supports SELinux on the head nodes and compute nodes.
SELinux On Compute Nodes
For Red Hat RHEL and CentOS compute nodes, the root file systems created by the
scyld-modimg tool include SELinux support as part of the
installation of the @core yum group. During the boot process the
mount_rootfs script will, like the standard dracut based
initramfs, load the SELinux policy before switching root. Note that
the default cmdline in the boot configurations created through
scyld-add-boot-config (including the DefaultBoot configuration) will
contain enforcing=0, thereby placing all compute nodes in SELinux
"permissive" mode. Only remove this option once you have completed
testing to confirm that your applications will run as expected with
SELinux in "enforcing" mode.
SELinux on compute nodes may be disabled in the standard ways through
command line arguments or by changing the contents of the node's
/etc/selinux/config configuration file. For details please refer
to appropriate distro-provided documentation.
In addition to the default "targeted" SELinux policy provided by RHEL and
CentOS, ClusterWare also supports the Multi-Level Security (MLS)
policy for compute nodes. Enabling the MLS policy inside an image is
done the same way as it would be done on a locally installed
system. After entering the image chroot using scyld-modimg, first
install the selinux-policy-mls package, and then modify the
/etc/selinux/config file to reference the newly installed policy.
Because the clusterware-node SELinux
policy module is installed at image creation time, it may need to be
re-installed after switching to the MLS policy:
semodule --install /opt/scyld/clusterware-node/clusterware-node.pp.bz2
The semodule command can also be used to check if the policy is
loaded:
semodule --list | grep clusterware
When exiting the chroot, ClusterWare automatically relabels
the file system based on the policy referenced in /etc/selinux/config.
Important
Fully configuring a cluster for MLS requires significant effort, including labeling objects on shared storage and defining additional policy around user workflows and tools. Please refer to your operating system documentation, as such details are beyond the scope of this document. Note that Scyld ClusterWare-provided schedulers, MPI implementations, and 3rd party applications may need additional custom permissions not covered here in order to configure a functional MLS cluster.
When creating boot configuration for an MLS enabled image,
please be aware that the MLS
policy, by default, does not allow the root user to log into the
compute node via ssh. Because ssh is used by the ClusterWare
soft power commands, please either enable the root login functionality
or use the _remote_user node attribute to configure login as a
user with sudo shutdown permission. The root login permission can
be enabled through the setsebool command, and the boolean is named
ssh_sysadm_login.
SELinux On Head Nodes
On head nodes, SELinux is detected to be in "enforcing" mode at both installation and service run time. To switch SELinux from "enforcing" to "permissive" mode, please see the documentation for your operating system. If this switch is made while the ClusterWare service is running, please restart that service:
sudo systemctl restart clusterware
MLS Policy On Head Nodes
For head nodes enforcing the MLS policy, the SELinux user sysadm_u should be used to install ClusterWare and run administrative tools.
To map a Linux user to the sysadm_u SELinux user, you can run:
sudo semanage login --add linux_user --seuser sysadm_u
By default, the sysadm_u user should run with the sysadm_t domain.
Security Technical Implementation Guides (STIG)
STIG security hardening implements compliance with the Defense Information Systems Agency (DISA) guidelines described in the Security Technical Implementation Guides (STIGs) (https://csrc.nist.gov/glossary/term/security_technical_implementation_guide). Certain high-security clusters may require STIG compliance.
ClusterWare provides basic STIG support for kickstarted nodes by adding the
following snippet to your kickstart *.ks file:
%addon org_fedora_oscap
    content-type = scap-security-guide
    profile = xccdf_org.ssgproject.content_profile_stig
%end
To configure a STIG head node, add the snippet to your kickstart config file
and reboot the node using that *.ks file to enable STIG.
Then install ClusterWare (Installation and Upgrade of Scyld ClusterWare) on the STIG-enabled
node in the usual way.
ClusterWare provides an example file
/opt/scyld/clusterware/kickstarts/basic-stig.ks with that snippet appended
for administrators who would like to kickstart infrastructure nodes or
additional head nodes with that STIG applied at install time.