Cluster Verification Procedures
Once the master node and compute nodes have been configured and rebooted, you should run through the cluster verification to identify common software and hardware configuration problems. This chapter describes the Scyld ClusterWare tools for monitoring cluster status and running jobs across the cluster.
Cluster verification is generally required by reseller technical support
when starting on a new issue. When you call your reseller for support,
they will require that you have completed the cluster verification
procedures outlined in this chapter, and that you capture information
using the beosi script.
Also see the Administrator's Guide and the User's Guide for more detailed information.
Monitoring Cluster Status
You can monitor the status of the nodes in your cluster using the
bpstat or beostatus commands.
bpstat
The bpstat command, run at a shell prompt on the master node, shows
a table of status information for each node in the cluster. You do not
need to be a privileged user to use this command.
Following is an example of the outputs from bpstat for a cluster
with 10 compute nodes.
Node(s)     Status       Mode       User       Group
5-9         down         ---------- root       root
4           up           ---x--x--x any        any
0-3         up           ---x--x--x root       root
Some things to keep in mind for bpstat:
- Ensure that each node is listed as up. The node count is based upon
the nodes and iprange entries in the
/etc/beowulf/configconfiguration file. - Nodes that have not yet been configured are marked as down.
- Nodes currently booting are temporarily shown with a status of boot.
- An error status indicates a node initialization problem. Check for
error messages in the log file
/var/log/beowulf/node.N(where N is the node number). Typical problems are failing network connections, unpartitioned harddrives, or unavailable network file systems.
BeoStatus
The BeoStatus tool is a graphical user interface (GUI) program. You can start it by clicking the BeoStatus icon on the desktop.

Alternatively, type the command beostatus in a terminal window on
the master node; you do not need to be a privileged user to use this
command.
You can also view the status of the cluster in text mode by typing the
command beostatus -c at a terminal window on the master node.
The default BeoStatus GUI mode (shown below) is a tabular format known as the "Classic" display. Each row corresponds to a different node, with specific state and resource usage information displayed per node.
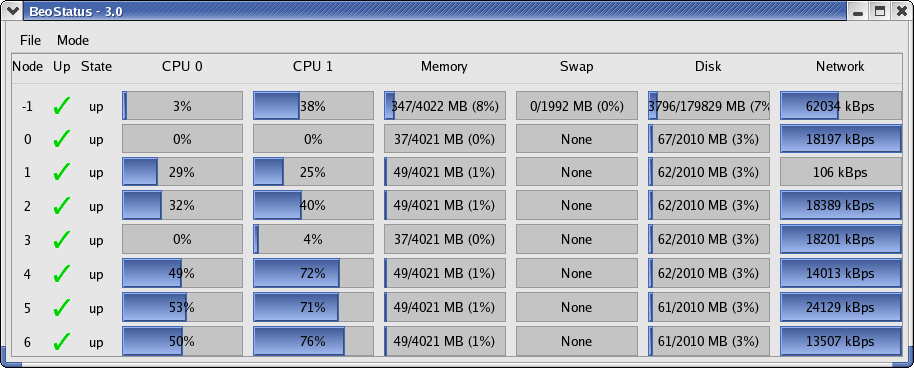
Figure 1. BeoStatus in the "Classic" Display Mode
You should sanity-check the information shown in the BeoStatus window. The configured nodes that are powered up (those with a green checkmark in the "Up" column) should show expected values in the associated usage columns. When there are no active jobs on your cluster, the CPU and Network columns should be fairly close to zero. The memory usage columns (Memory, Swap, and Disk) should be showing reasonable values.
- Node — The node's assigned node number, starting at zero. Node -1,
if shown, is the master node. The total number of node entries shown
is set by the "iprange" or "nodes" keywords in the file
/etc/beowulf/config, rather than the number of detected nodes. The entry for an inactive node displays the last reported data in a grayed-out row. - Up — A graphical representation of the node's status. A green checkmark is shown if the node is up and available. Otherwise, a red "X" is shown.
- State — The node's last known state. This should agree with the
state reported by both the
bpstatandbeostatuscommands. - CPU "X" — The CPU loads for the node's processors; at minimum, this indicates the CPU load for the first processor in each node. Since it is possible to mix uni-processor and multi-processor machines in a Scyld cluster, the number of CPU load columns is equal to the maximum number of processors for any node in your cluster. The label "N/A" will be shown for nodes with less than the maximum number of processors.
- Memory — The node's current memory usage.
- Swap — The node's current swap space (virtual memory) usage.
- Disk — The node's harddrive usage. If a RAM disk is used, the maximum value shown is one-half the amount of physical memory. As the RAM disk competes with the kernel and application processes for memory, not all the RAM may be available.
- Network — The node's network bandwidth usage. The total amount of bandwidth available is the sum of all network interfaces for that node.
Running Jobs Across the Cluster
Jobs can be executed on a Scyld cluster using either "directed
execution" with the bpsh command or "dynamic execution" with the
beorun or mpprun commands.
Directed Execution with bpsh
In the directed execution mode, the user explicitly defines which node
(or nodes) will run a particular job. This mode is invoked using the
bpsh command, the ClusterWare shell command analogous in functionality
to both the rsh (remote shell) and ssh (secure shell) commands.
Following are some examples of using bpsh:
This example runs
hostnameon the compute node and writes the output back to the user's screen from compute node 0:[user@cluster user]$ bpsh 0 /bin/hostname .0
The following example runs the uptime utility on node 0, assuming it is installed in /usr/bin:
[user@cluster user]$ bpsh 0 /usr/bin/uptime
  12:56:44 up  4:57,  5 users,  load average: 0.06, 0.09, 0.03
Dynamic Execution with beorun and mpprun
In the dynamic execution mode, Scyld decides which node is the most
capable of executing the job at that moment in time. Scyld includes two
parallel execution tools that dynamically select nodes, beorun and
mpprun. They differ only in that beorun runs the job on the
selected nodes concurrently, while mpprun runs the job sequentially
on one node at a time.
The following example shows the difference in the amount of time the
system uses to run a command with beorun vs. mpprun:
[user@cluster user]$ date;beorun -np 8 sleep 1;date
  Fri Aug 18 11:48:30 PDT 2006
  Fri Aug 18 11:48:31 PDT 2006
[user@cluster user]$  date;mpprun -np 8 sleep 1;date
  Fri Aug 18 11:48:46 PDT 2006
  Fri Aug 18 11:48:54 PDT 2006